Schedule Templates
Last updated: 2026.11.9
Save process templates for different types of construction as schedule templates, then load one as the project's processes when you create a project. You register and manage them in the Schedule Templates menu.
Process hierarchy
Processes have three levels. (Level 1: process group, Level 2: process, Level 3: detailed process)
| Item | Description |
|---|---|
| Process group | The top level, a name that covers similar processes, usually a construction phase Example) Design, Supervision, Building construction, Interior work, Civil works |
| Process | A main trade, meaning a specialized line of work or field Example) Schematic design, Construction supervision, Waterproofing, MEP work, Electrical work ※ Shown as a sub-process in the project schedule |
| Detailed process | A unit of work carried out within a process Example) Scaffolding installation, 2F slab rebar placement, Ready-mixed concrete pouring, System window installation |
What is a base process?
It is the process classification system provided by CaasWorks. It is used to track and analyze recorded data and make processes more efficient. Every process must have a base process.
Template list
Search the list by title. Click a row to open that template's detail screen.
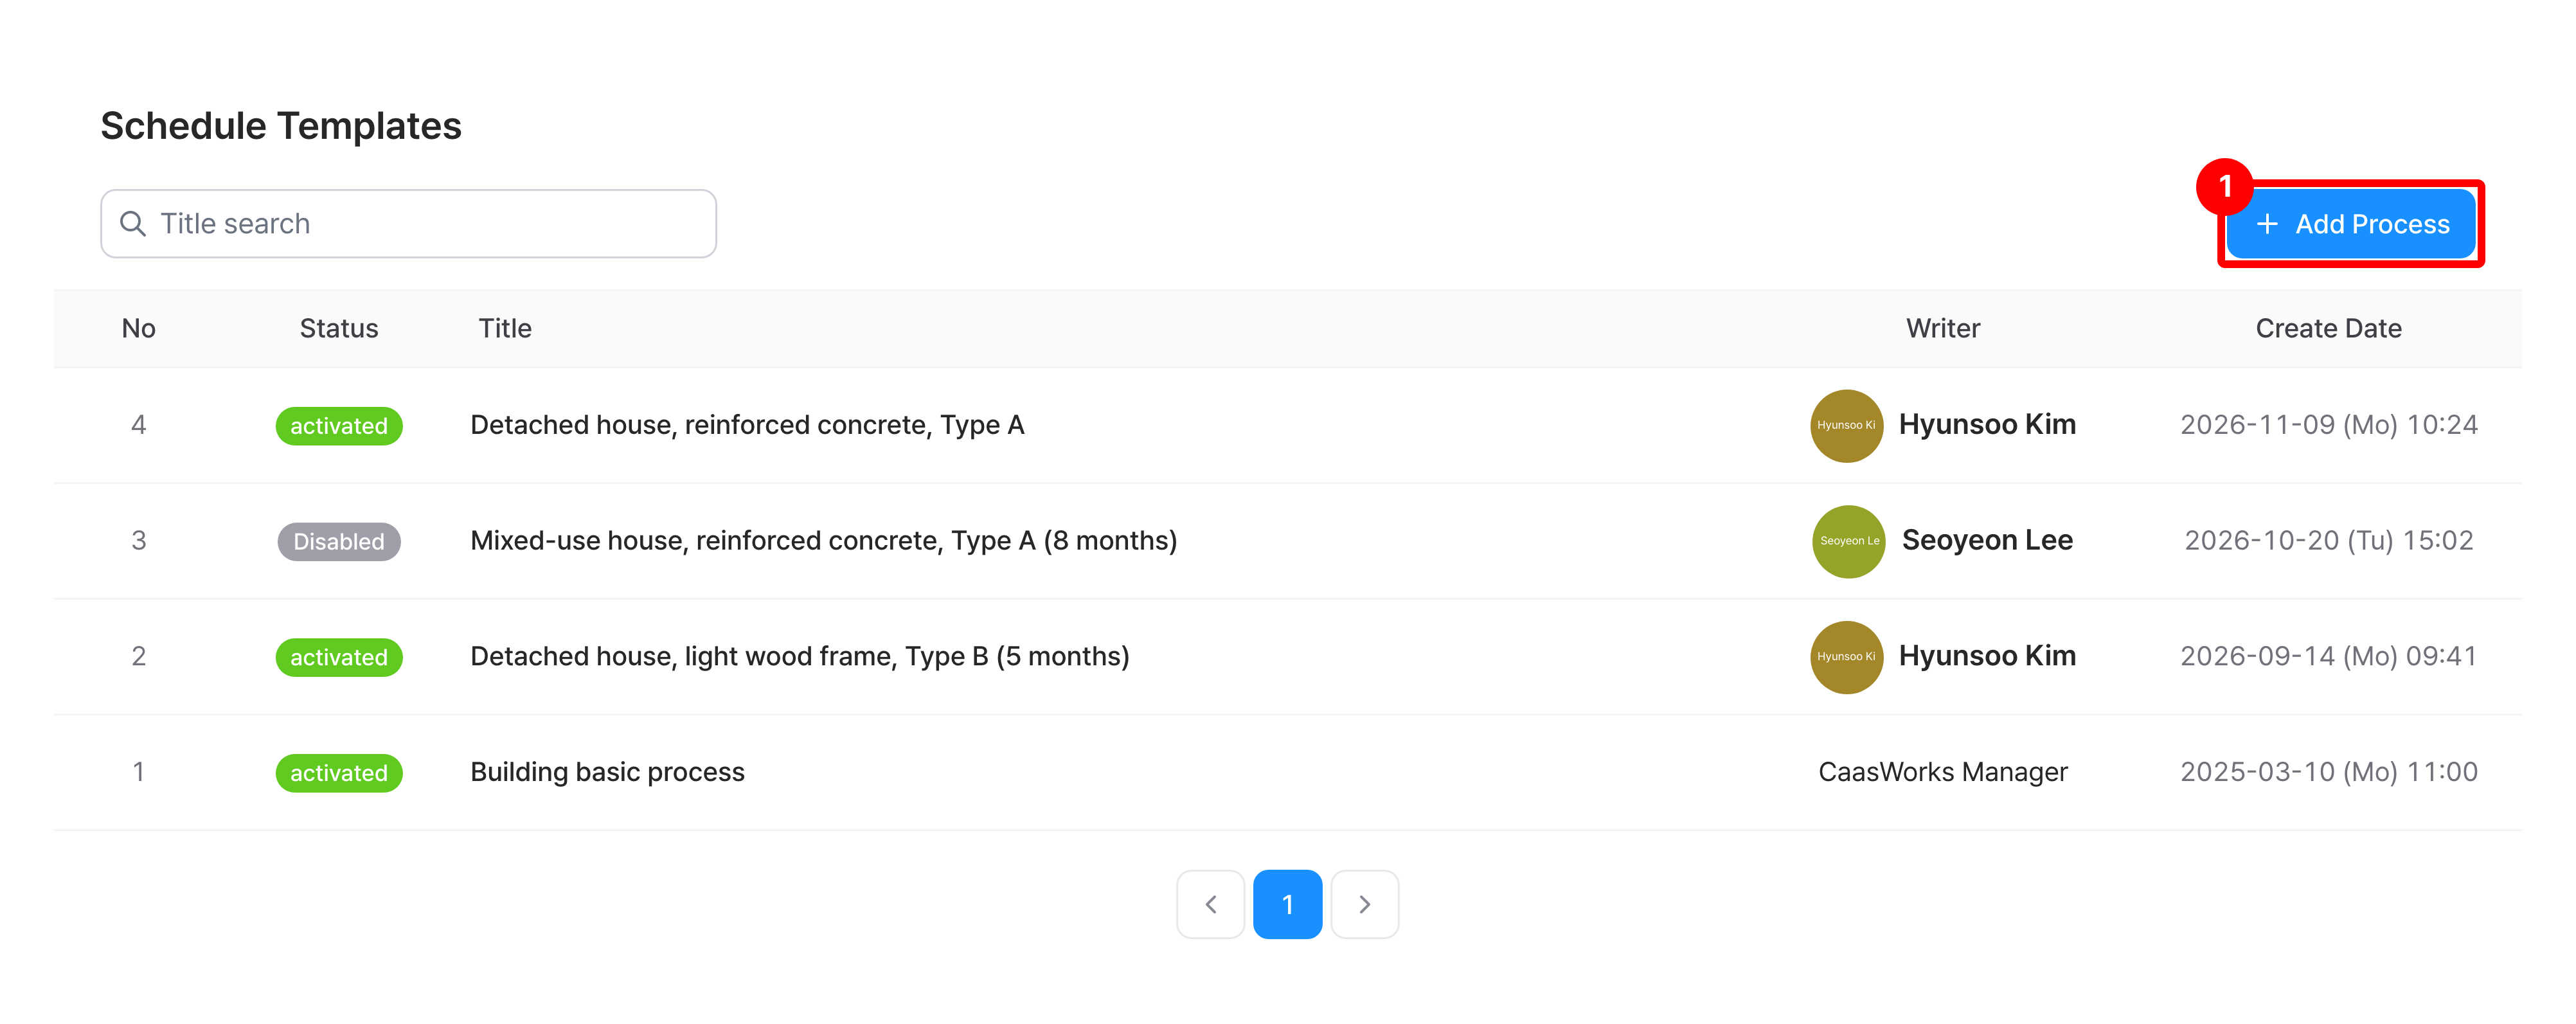
| Item | Description |
|---|---|
| Status | activated or Disabled ※ Only activated templates appear in Select a basic construction process type when you create a project |
| Writer | The person who registered the template ※ Templates shown as CaasWorks Manager are provided by CaasWorks |
Register a template
In the list, click Add Process.
Set the title, activation, and country.
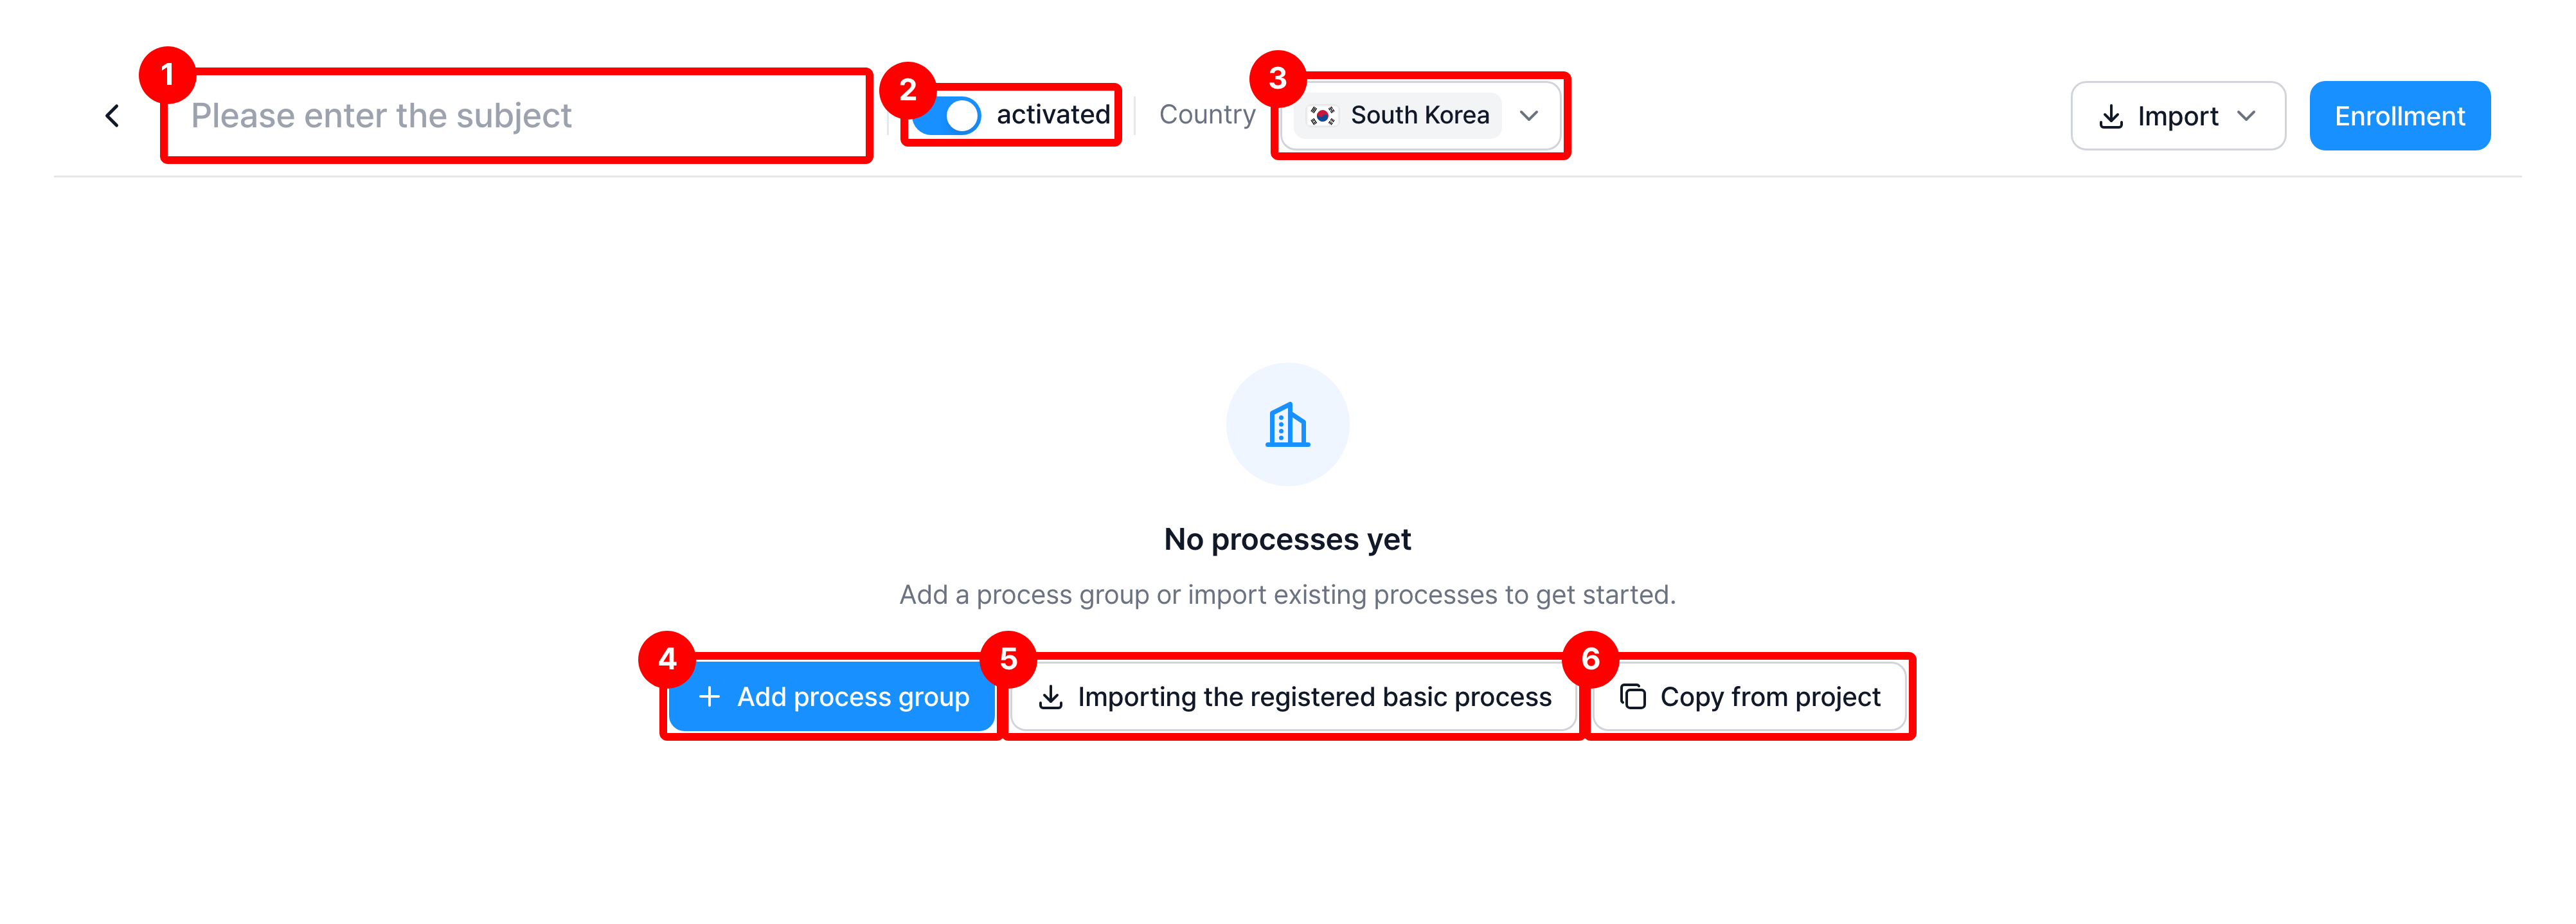
| Item | Description |
|---|---|
| ① Title | Enter the name shown in the list and on the project creation screen |
| ② Activation | When on, you can select this template when you create a project ※ On by default |
| ③ Country | Select the countries that use this template (multiple selection) ※ Your company's country is selected by default ※ Only base processes for the selected countries can be chosen, and the template appears only for projects in those countries |
Title examples
- Detached house, light wood frame, Type B (5 months)
- Mixed-use house, reinforced concrete, Type A (8 months)
To start from scratch, click ④ and go to the next step. To start from existing processes, click ⑤ or ⑥ (see Load existing processes below).
Click Add process group, enter the process group name, then press Enter.
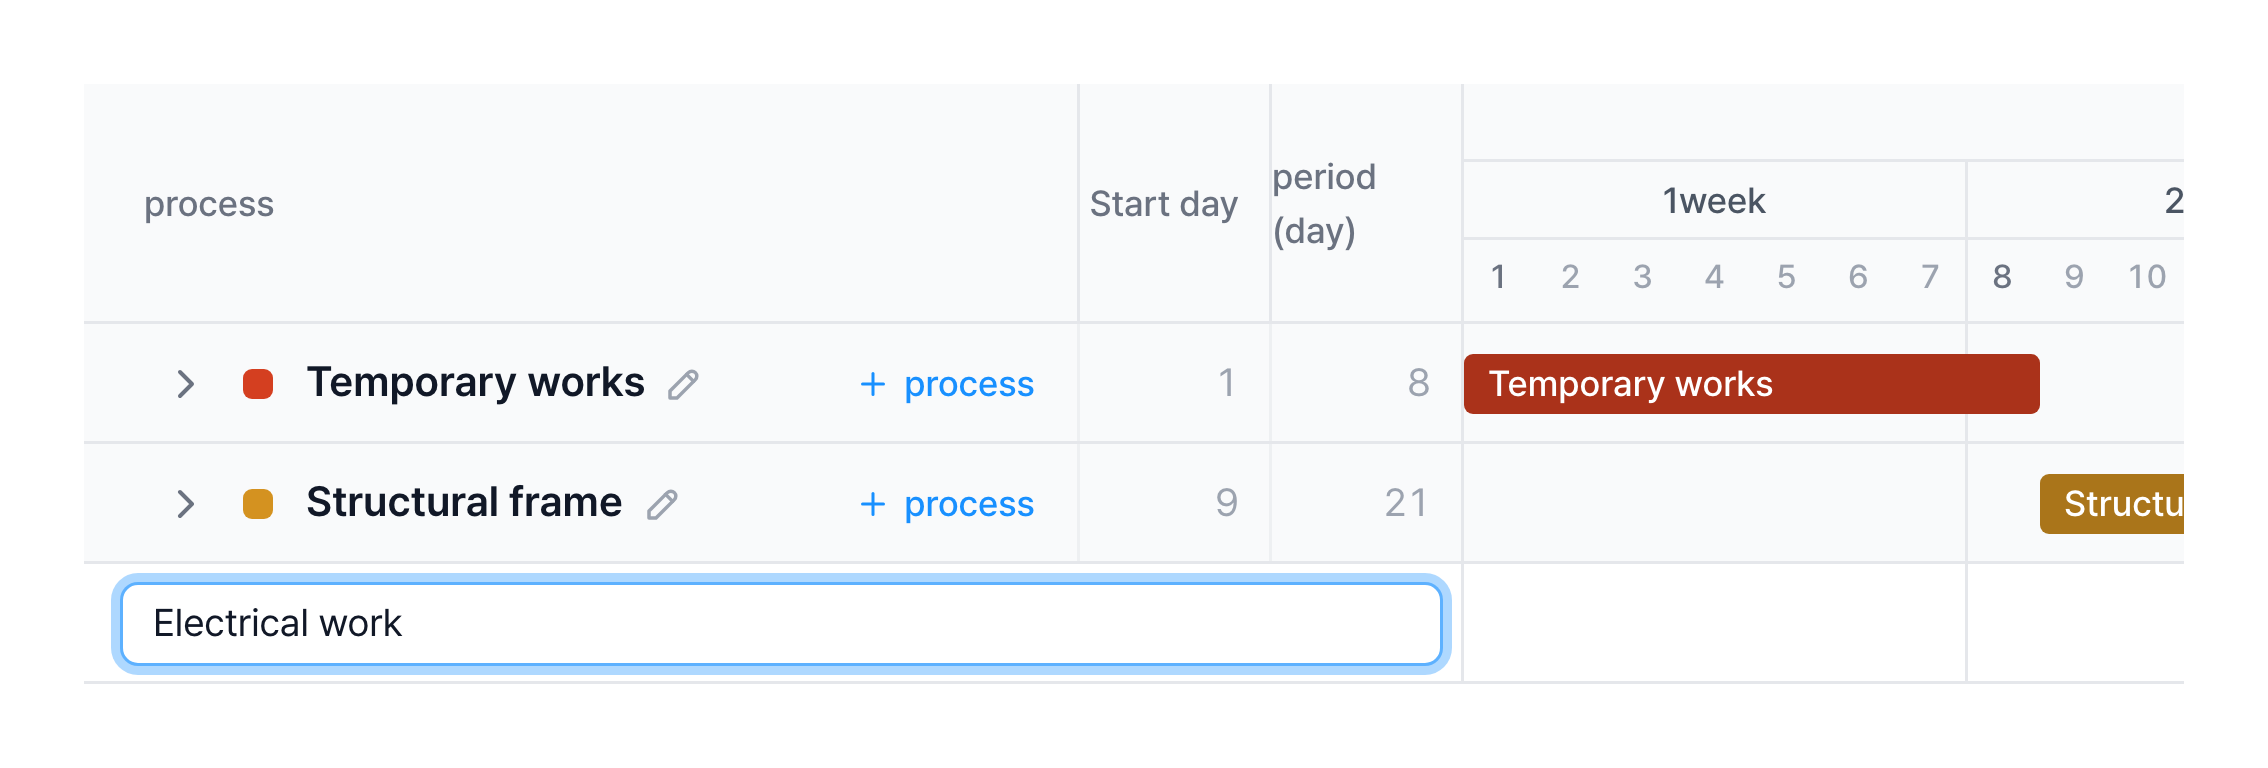
The process group color is picked automatically from the colors not yet in use. To change it, click the color square to the left of the group name and choose another color.
In the process group row, click + process, then search for and select a base process.
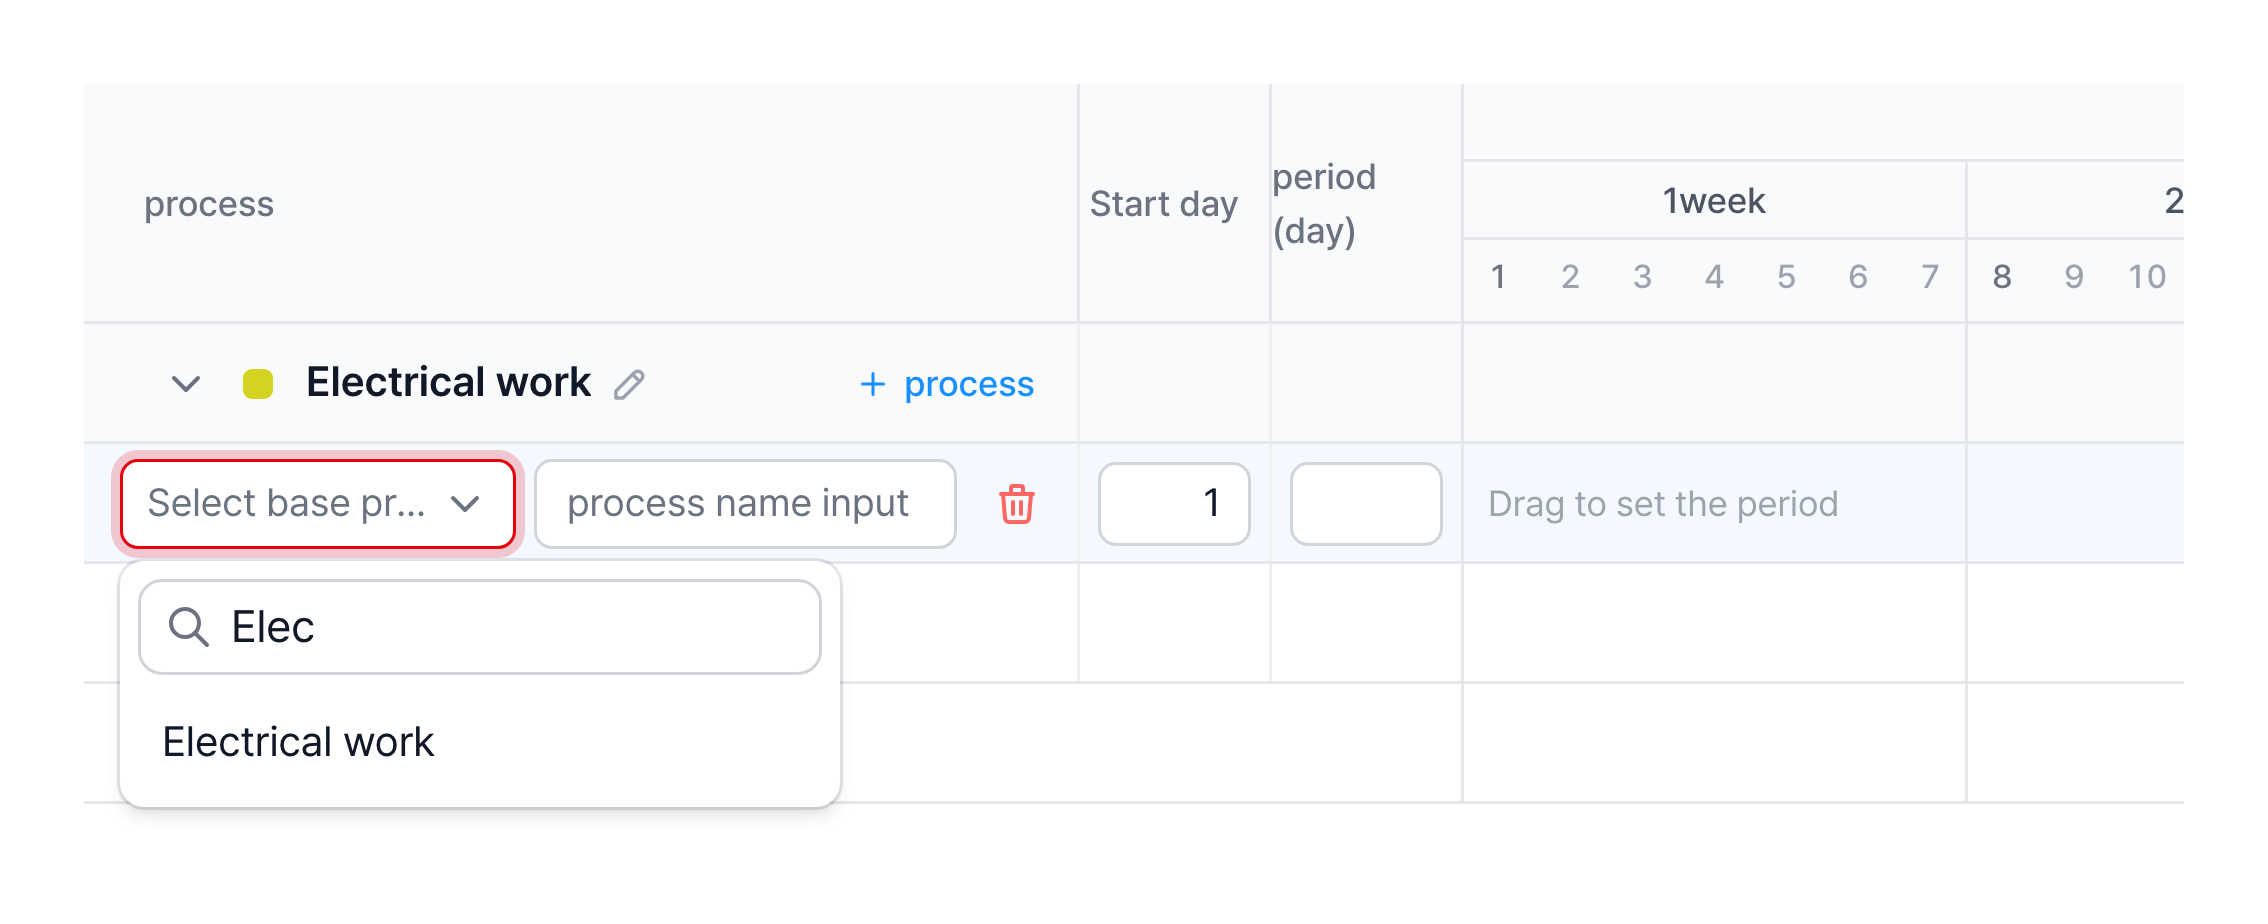
| Item | Description |
|---|---|
| Select base process | Search for and select a base process Temporary works, Structural frame, Waterproofing, Electrical work |
| Process name | The selected base process is shown automatically as the process name ※ You can change it to any name (Structural frame → Reinforced concrete) ※ When you change the name, the base process is shown in gray next to it |
| Start day · period (day) | Enter the day the process starts and its period as numbers ※ Do not enter a period for a process that has detailed processes (see How the construction period is calculated below) |
Press Enter in the input row to open the next process row below it.
You can also drag on the chart in the Drag to draw a process row at the bottom of a process group. The dragged range becomes the process period, and you then select a base process.
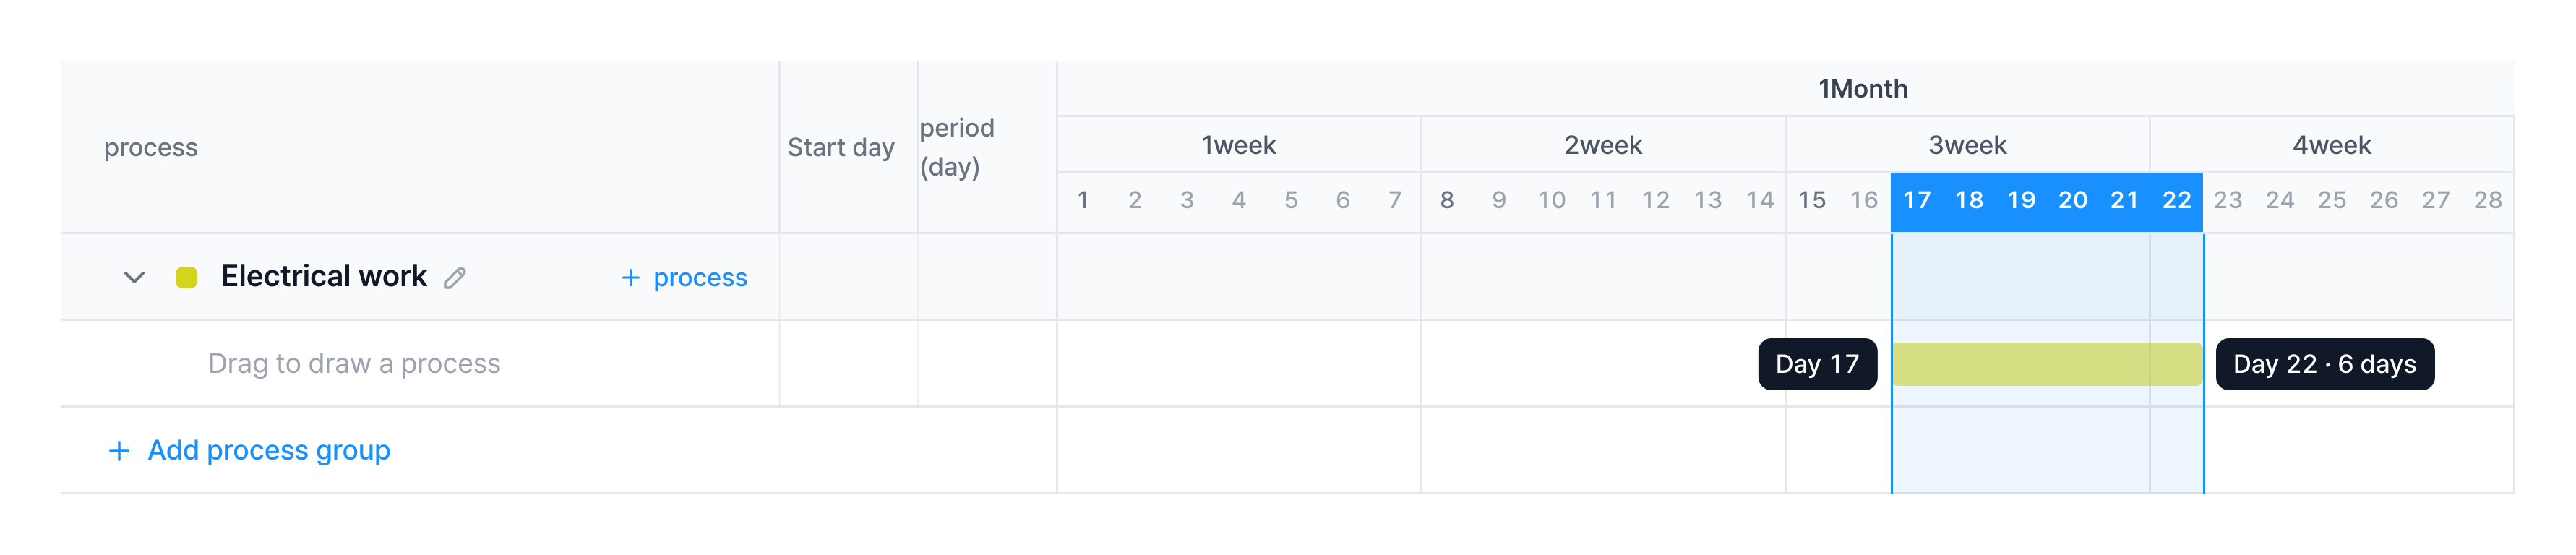
If you move to another row without selecting a base process, that process is removed.
In the process row, click + Detailed process, enter the detailed process name, then set its period.
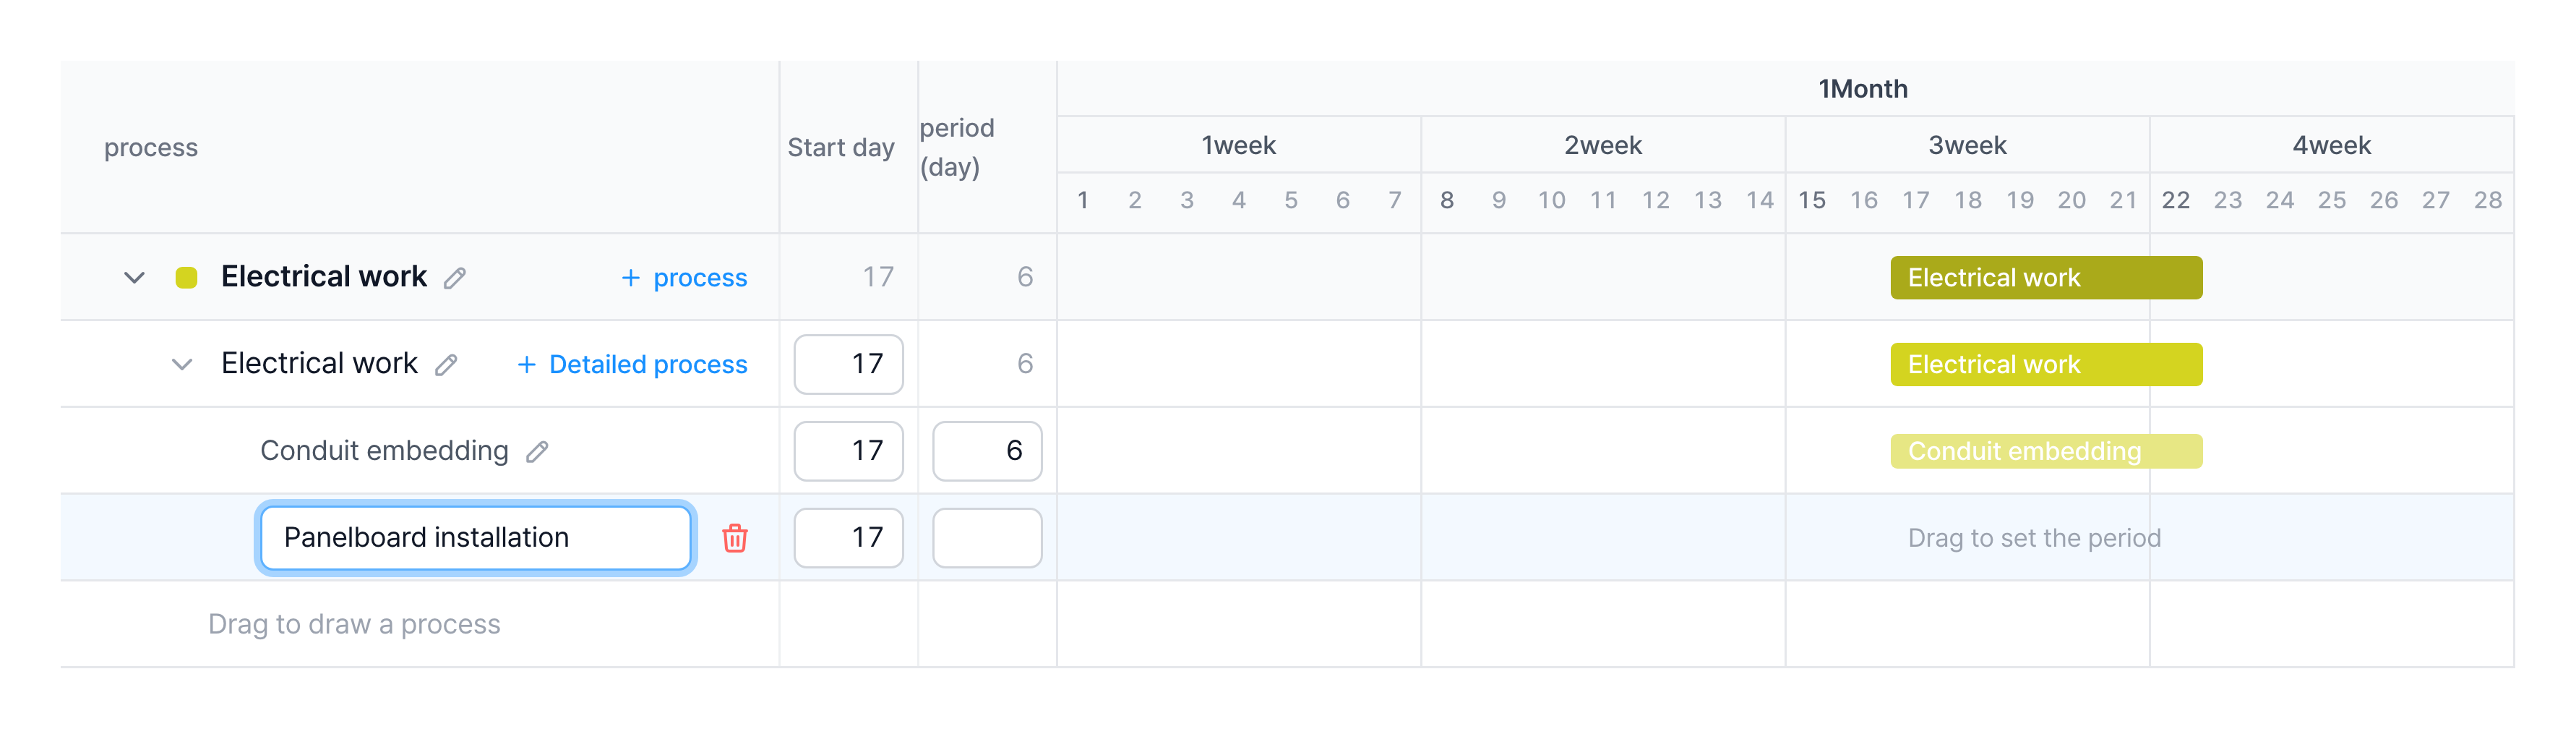
There are two ways to set the period.
- Drag on the Drag to set the period area of the chart. If you click without dragging, the bar is placed with the length of one scale unit (1 day for day, 7 days for week, 30 days for month).
- Enter numbers in the Start day and period (day) fields in the table.
Detailed process examples
For Temporary works: Scaffolding installation, Layout marking, Scaffolding removal
If you move to another row with the detailed process name empty, that row is removed. A detailed process needs a period before you can register the template.
When all processes are added, click Enrollment.
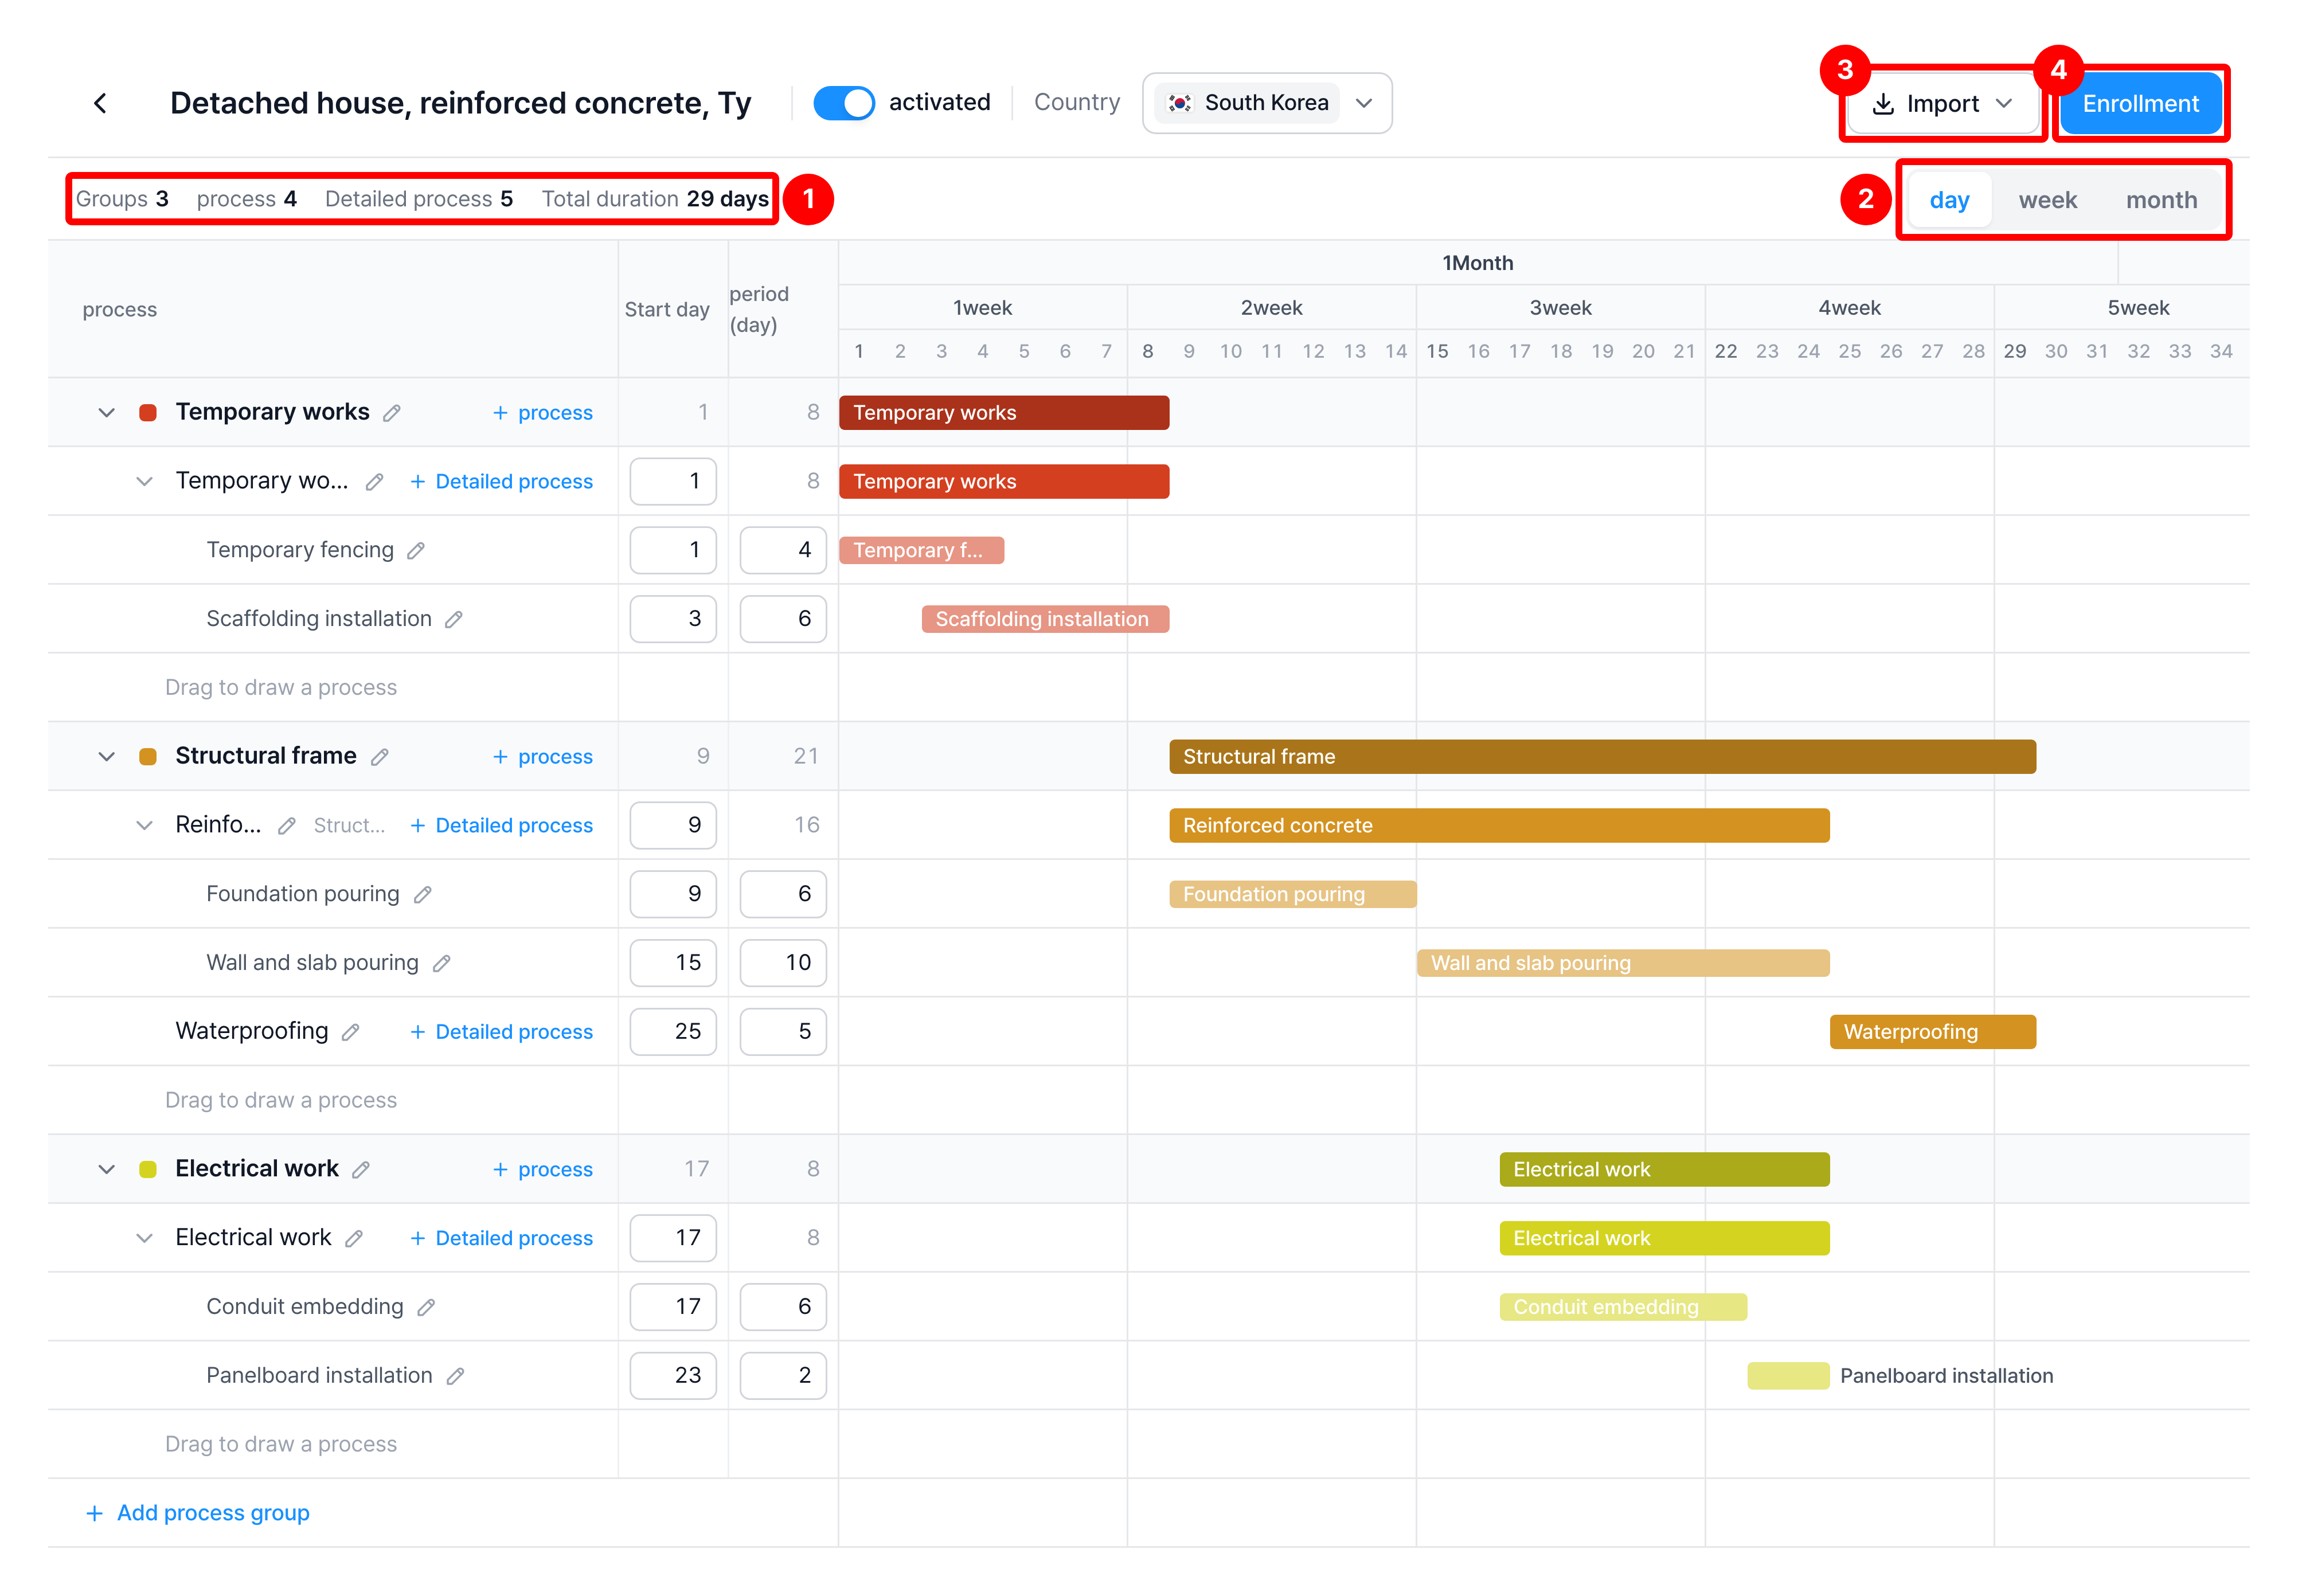
| Item | Description |
|---|---|
| ① Summary | The number of process groups, processes, and detailed processes, and the total duration |
| ② Scale | Show the chart by day, week, or month |
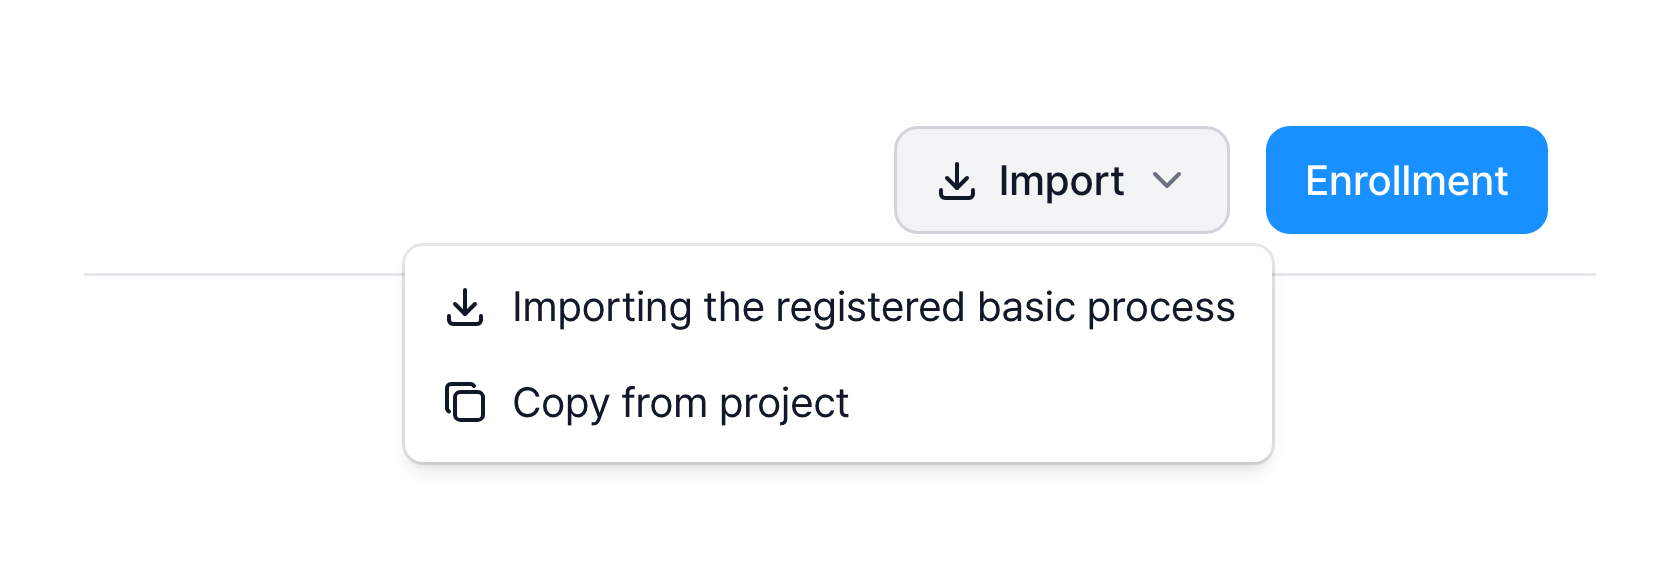
| ③ Import | Bring in a registered template or a project's processes |
| ④ Enrollment | Register the template with what you entered |
If any of the following is missing, a message appears and the template is not registered.
- Title and country
- At least one process group, and at least one process in each group
- A base process for every process
- A name and a period for every detailed process
Adjust the schedule
Change the schedule with the bars on the chart and the number fields in the table. Hover over a bar to see its name and period.
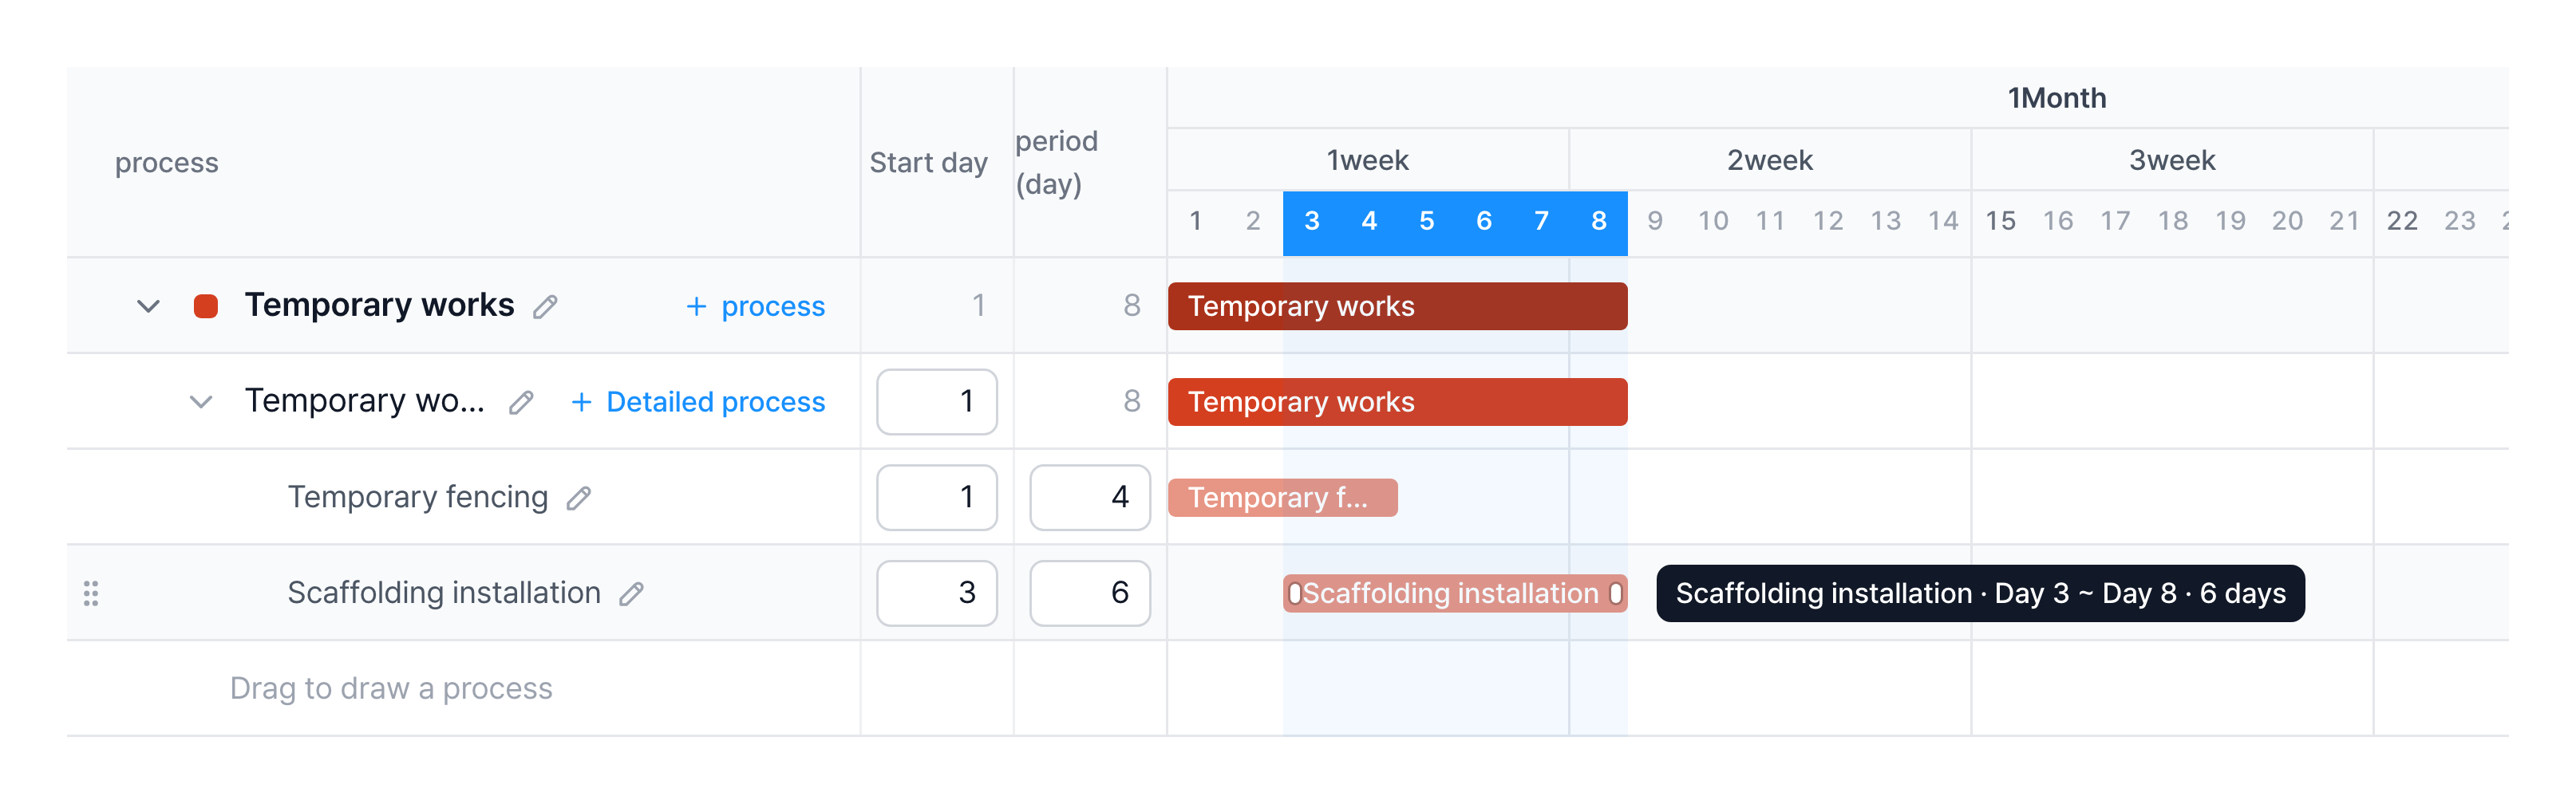
- Drag a bar to move it. Dragging a process group bar moves all processes and detailed processes in it.
- Drag either end of a bar to change the period. This works only for detailed processes and for processes without detailed processes.
- You can also enter numbers in the Start day and period (day) fields.
- While dragging near the edge of the chart, it scrolls sideways. At the right end, the chart extends so you can keep dragging.
You can enter a period for both processes and detailed processes.
If a process has detailed processes, its period runs from the earliest start to the latest end among them. In that case, the process period is shown in gray and cannot be edited. Process group periods are calculated the same way, and detailed processes without a period are left out.
Reorder and rename
- Reorder: Hover over a row to show a handle to the left of the name. Drag the handle to change the order. You can reorder process groups, processes within the same group, and detailed processes within the same process.
- Rename: Click a name to turn the row into an input row. Press Enter or click outside to apply the change, or press Esc to undo it.
- Delete: Click the delete icon on the right of the input row. Deleting a process group also deletes its processes and detailed processes.
Load existing processes
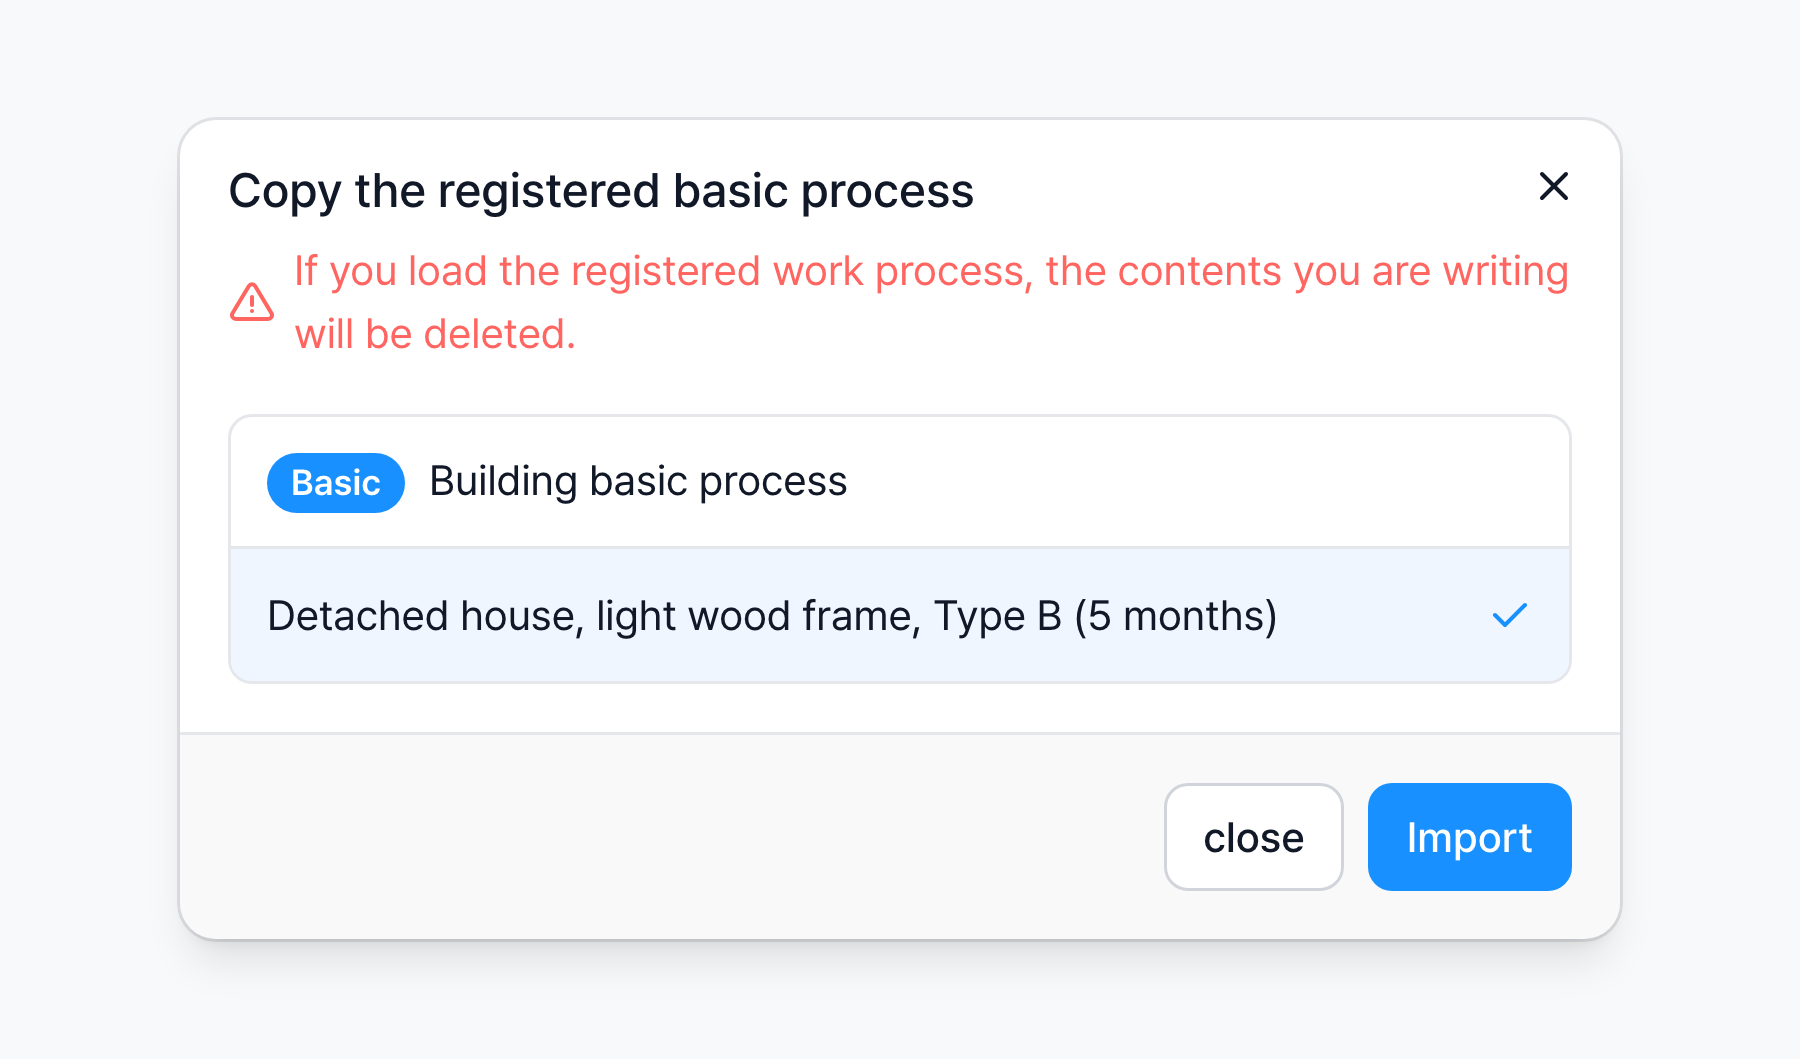
Click Import to see two options. Either way, the processes you are editing are replaced with the loaded ones.
Select one of the activated templates and click Import. Templates provided by CaasWorks are marked Basic.
Edit or delete a template
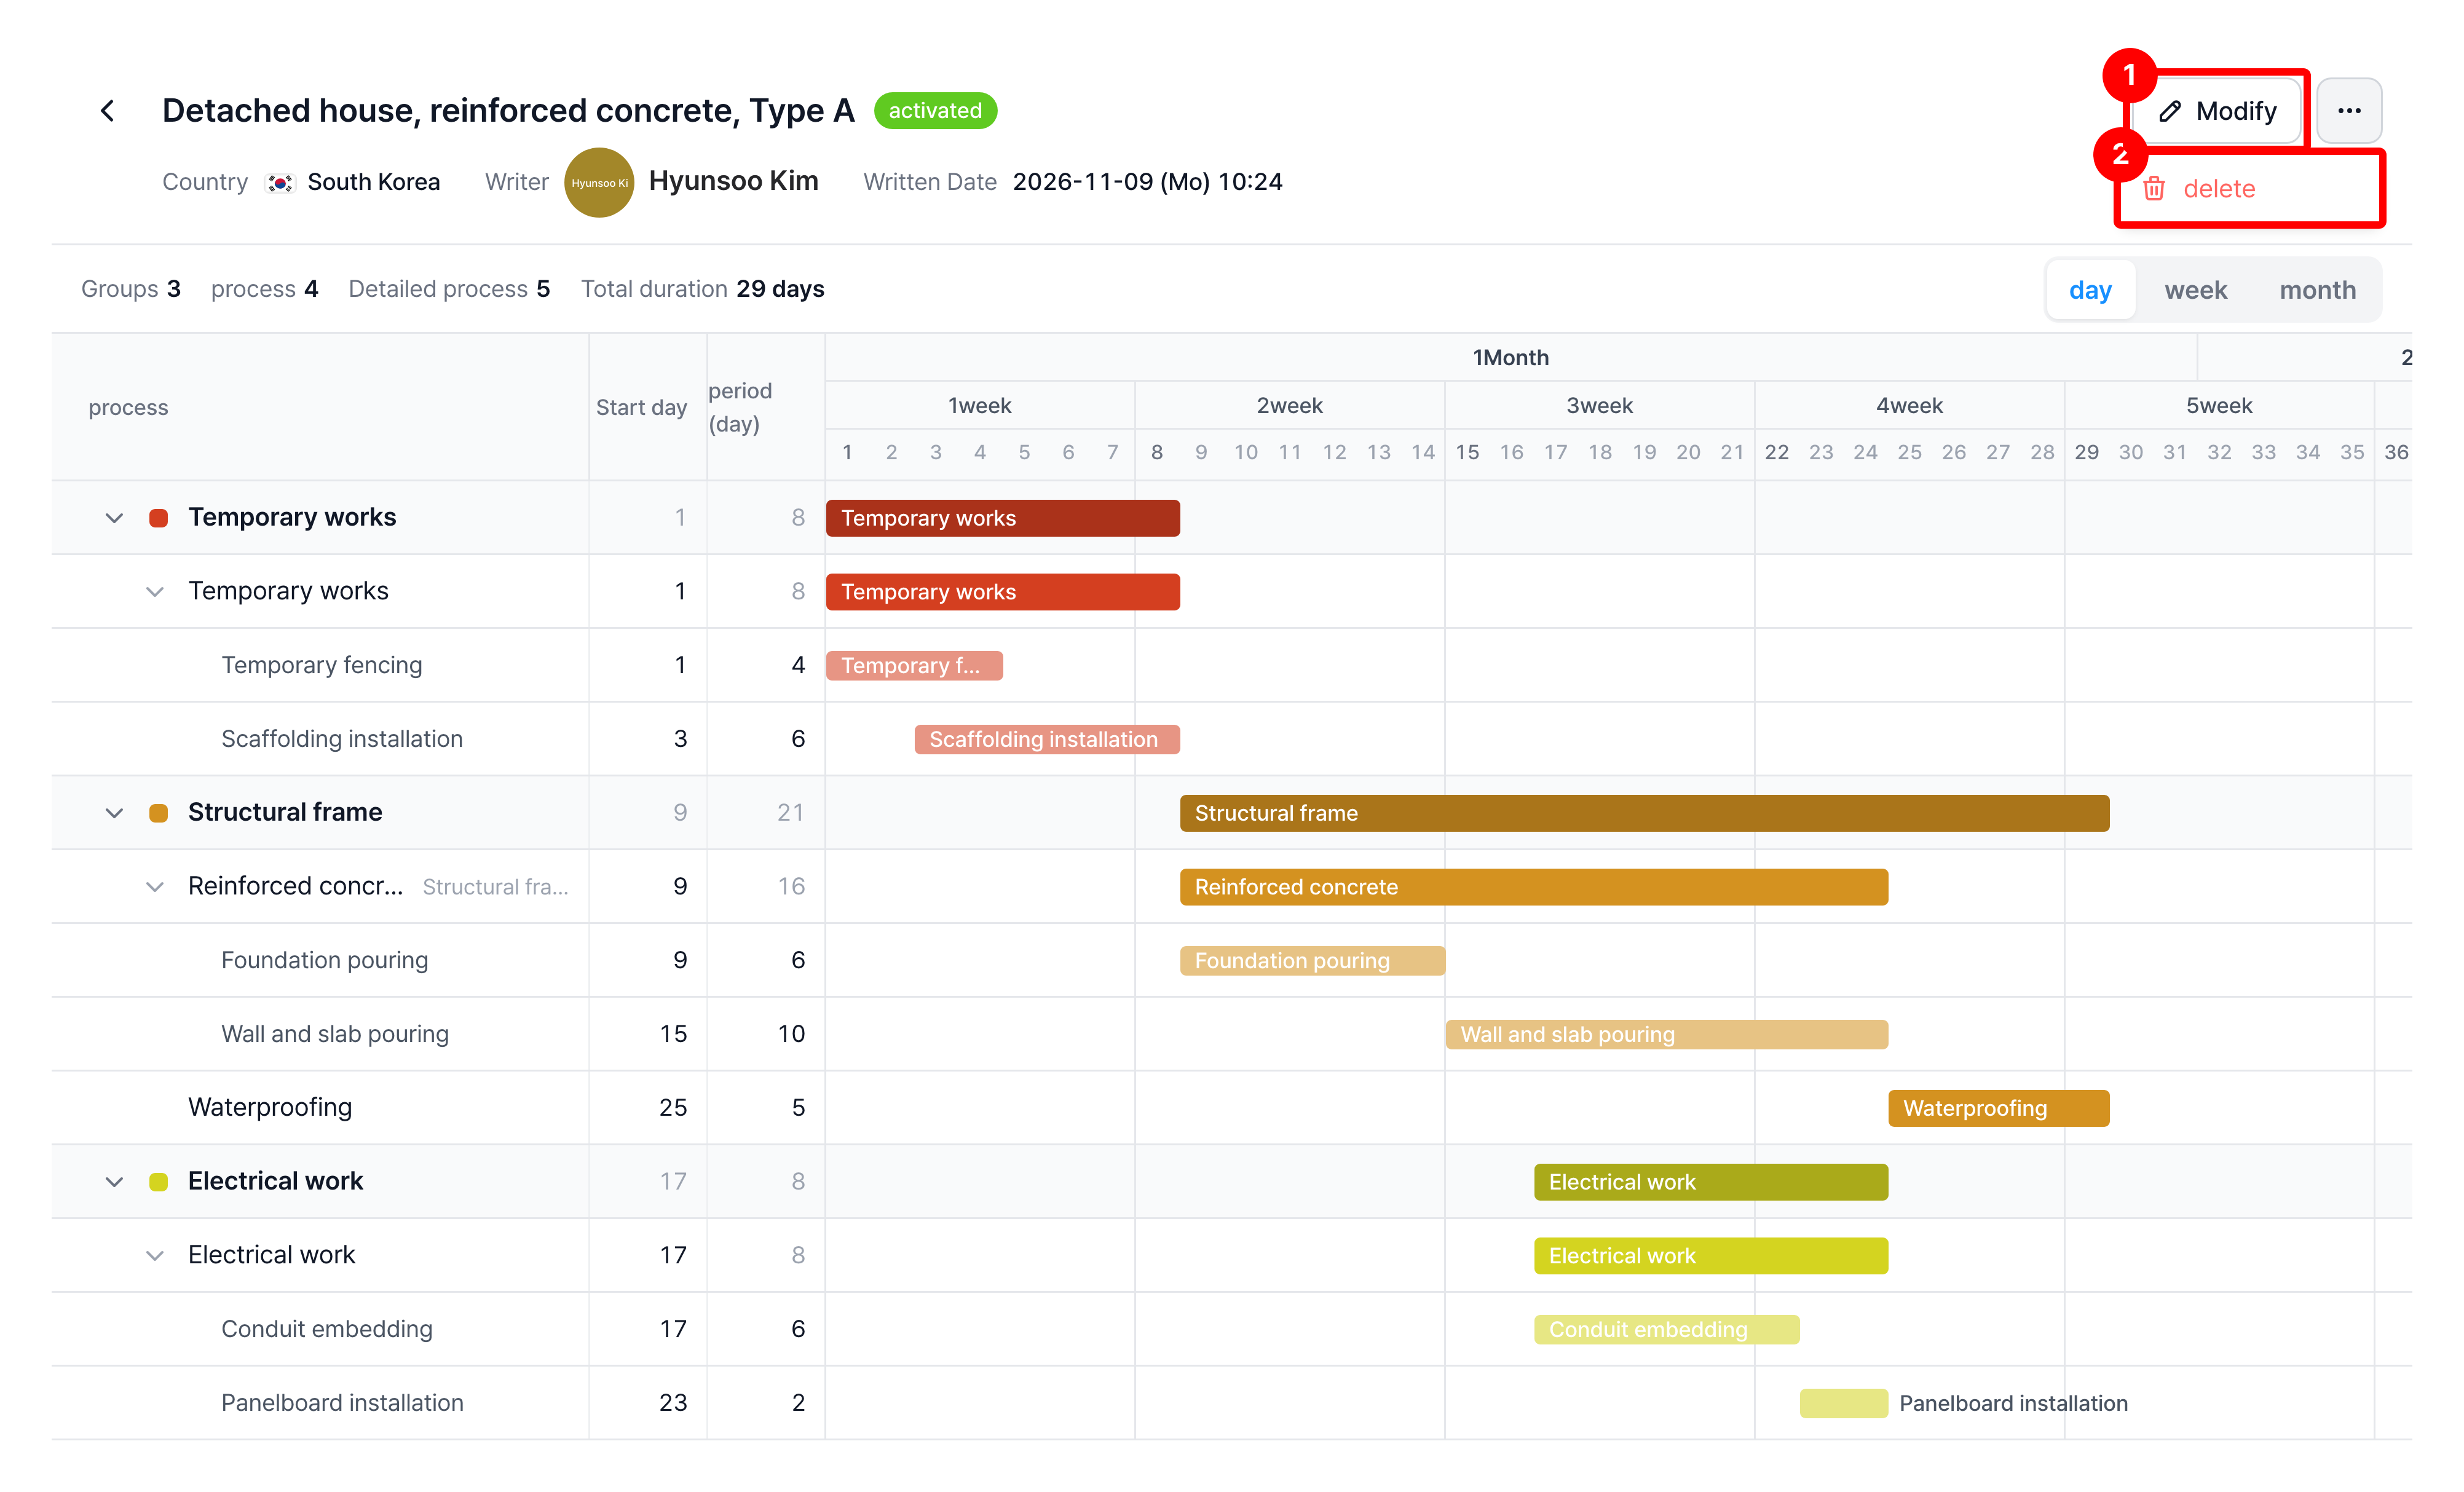
Click a template in the list to open its detail screen.
| Item | Description |
|---|---|
| ① Modify | Make changes on the same screen as registration, then click [Modify] to save |
| ② delete | Click the more button, click [delete], then click [delete] in the confirmation window ※ Deleted templates cannot be restored |
The Modify and delete buttons are shown only to the person who registered the template and to admins.
When you create a project, select a registered template under Select a basic construction process type. Create a project ➡️